
WINDOW FASHIONS WEDNESDAYS: HOW TO DRESS WINDOWS ON THE BED WALL
Heads up: I use affiliate links for my fave products. If you click and purchase, I may receive a small commission at no extra cost to you.
A popular placement of windows in a bedroom is on the bed wall flanking where the bed would be positioned. This can pose some challenges in terms of how to dress the windows when you will likely have a nightstand on either side, basically sitting right under the windows. There's no hard and fast rule about window coverings, but if you were to ask my professional opinion, my advice would be to avoid anything too fussy. Remember, this is going to be a high traffic zone and I'm not referring to foot traffic. Your nightstands will be grand central station at certain times of the day. It will be home to lamps, alarm clocks, books, journals, tissues, phones, chargers...it's high traffic! With that said, do you really want to mess with a lot of fabric getting in the way? I wouldn't. Plus, who wants something collecting dust behind the furniture...not me! Notice these first two photos of drapery panels hung on either side of the bed? Not to say there's anything wrong with this because there are many people who like this look and want it. I'm just sharing my opinion of what I would recommend and I would avoid drapery if at all possible. First of all, this first photo is probably a staged home because those nightstands would be useless in real life applications. Notice how you would have to draw the panels every night to cover the window and filter the morning light and then open the drapery each morning to expose the windows? That's just too high maintenance in my book.

This second room is pretty, but again, same idea as the first. You'd have to draw the panels back and let them go every morning and night unless those are purely decorative and you have another shade under the drapery panels that actually blocks the light from coming in in the mornings. Is it hard to do? No, but trust me when I say I've met thousands and thousands of homeowners by now and people are inherently lazy. Adding an extra step to anything causes negative results and in this case, this beautiful photo is not the condition the room will be in on a daily basis. The perfectly swagged drapery will not exist, trust!
So, what would I recommend you ask? Great question! Here are some of the window coverings I would recommend and I'll tell you why...
First up are Shutters, most commonly known as plantation shutters. There are a lot of options in different price points nowadays besides wood which can be expensive and not always practical. Shutters are an ideal window covering as seen in this photo because it sits nice and tight against the windows. There's nothing hanging, drooping or getting in the way. The louvers are easily accessible via a tilt rod and it provides the light blocking and filtration that anyone would need without a lot of effort. Did you also know that shutters are the only window coverings that truly add value to your home because it's considered a fixed asset? Shutters are custom made for your windows specifically and since they're not transferable, it wouldn't make sense to take them with you.


Another option are natural woven shades, as pictured here. Natural wovens are usually made of bamboo, grasses or other natural materials so it has great texture, variations in color and have a nice organic quality about them. They can be made with or without a privacy liner which changes the look and feel of the shade itself. Similar to a shutter, they are made to fit nicely around the window opening. In this photo, they are inside mounted which gives it a nice clean look and allows you to appreciate the molding and paint colors around it. When there's not enough window depth, an outside mount is also an option. I love how they layered drapery panels over the natural wovens on the larger window. Do you see how having panels behind the nightstands would be cumbersome?
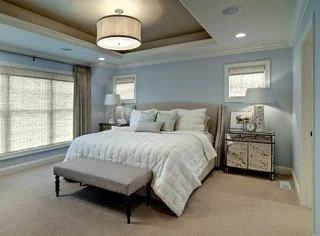
And my all time favorite choice would be a fabric shade, most commonly known as roman shades. There are many different styles of roman shades. This photo below showcases a relaxed roman and notice again, they installed wall to wall drapery on the larger window but kept it simple behind the bed. This offers easy access to the windows if you want to open them for fresh air, you can easily access plugs behind the furniture as needed, it's just a nice, clean, tailored look.


I hope you found this tutorial helpful. If you currently have drapery panels on your windows, how do you like them? Would you consider moving to a more tailored option? Please, leave me a comment and let me know what works best for you...I'd love to know!
Thanks for stopping by...see you again soon!
Subscribe to the Behind the Renovation Design Journal
Sign up to receive the latest home renovation tips, resources, and inspiration!

RELATED POSTS


