A-Z HOME DECOR TREND 2014: JAR CRAFTS
Heads up: I use affiliate links for my fave products. If you click and purchase, I may receive a small commission at no extra cost to you.
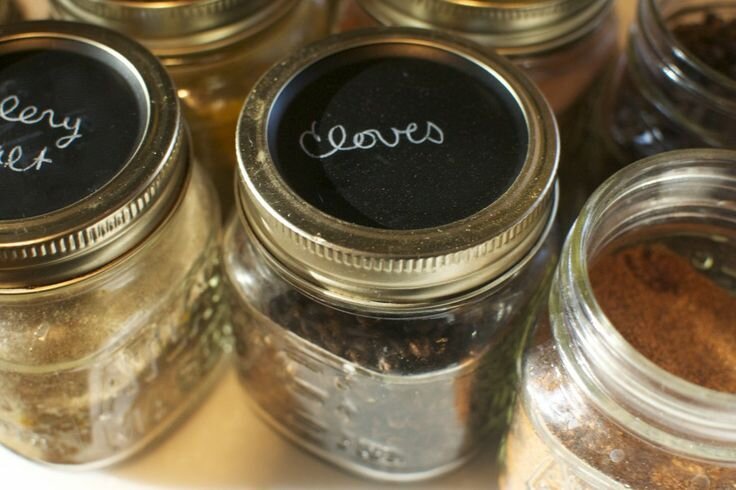
Welcome Back to the second half of week 5 of the A-Z Home Decor Trend Guide 2014.Over a period of 13 weeks, I'm revealing the hottest home decor trends currently heating up the market, design blogs, and the internet. Today's home decor trend starts with the letter J for...Jar Crafts! Mason jars are all the rage and they're not just for preserving fruit anymore! Mason jars are being used for everything from serving drinks, displaying dry goods to recently becoming one of the most popular lighting trends with different jar lights! Look how beautiful it is to have uniform jars in your pantry displaying all your dry goods. It's organized and because they're clear jars, you can easily identify what the items are and grab what you need easily.
For those items that you want to label, this is a super easy DIY idea...spray the lids with chalkboard paint and use chalk to easily identify what is what.
What a great way to add mood lighting to your outdoor space...jars filled with beans or sand or pebbles and drop a candle in it. The enclosure keeps the flame alive (or use battery operated candles and you never have to worry) and when used in a grouping like this, it's so dramatic. They can be hung like shown or even just placed on a table, fence or the ground. How lovely would this be lining a path.
Here's an easy DIY project...paint the inside of the jars to create a milk glass effect.
Now...let's talk about different styles of jar lighting. It's been a popular trend in the last 2 years. How dramatic is this tiered jar chandelier...perfect addition to a rustic or industrial styled space.
I really like the look of this light because the jars have a cut glass look to them and the use of the edison bulbs give it a very industrial chic look. Follow the link below the photo for instructions on how to DIY your own. Unfortunately, the instructions are in Dutch but I have translated it for you below and even cleaned up the wording as much as I could...you're welcome! Make sure you refer to the great photos in their post to get the step-by-step visuals.
DIY Jar Light Instructions: What do you need ? A jar of course . There is only one requirement, that the top is large enough to fit a bulb through width and length. You can look for vintage jars like the beautiful Ball Mason Jars from America . But you can also just go buy the Casa as we did or any jar that you already have.
You also need a bulb, and preferably a nice , because it is very visible. We chose an Edison bulb. You can also opt for a more ecological alternative if you will use the lamp often. Furthermore, you still need the electrical wiring. We found one ready with the wire already which is super convenient . Tools you'll need is a nail and a hammer to make the cover for the opening. And paint to paint the lid and the socket (spray paint is great for this task).The first step is the hardest . The lid has a hole should be where the socket fits through it. Draw a circle and attach the wire with tape and paint the fitting and the cover in the same color for best results. Let dry and you can turn the lamp in it and the cover screws on the jar. Voila, it's that simple. Now hang the bulb where you want it. The best results are when you hang the lights at different heights, or hang 3 lamps together in a row. Use the nail and hammer to knock the cover holes in the lid so the hot air can escape. Insert the fitting through the hole and screw the cap from underneath when sitting there. Do not tighten too much or it may cause the lamp to tilt.
What do you think of this trend? Yay or Nay on the jar crafts? I'd love to see pics of how you've incorporated jar decor into your home. Please share with me by posting pics to my Facebook Page or Tag me on Twitter @alicetchan & Instagram @alicetamchan and use hashtag #2014homedecortrend.You're also invited to follow my A-Z Home Decor Trends 2014 Pinterest Board where you can see even more inspiration photos of all the trends I'll being sharing throughout the 13 weeks...see you online!
Subscribe to the Behind the Renovation Design Journal
Sign up to receive the latest home renovation tips, resources, and inspiration!
RELATED POSTS


